In SharePoint, To configure Form Based Authentication follows below steps,
Step I: Create a database in SQL for FBA Users
Step II: Add FBA User in SQL Database
Step III: Create a Web Application [Default Zone]
Step IV: Extend Web Application [Internet Zone]
Step V: Configure Authentication in Central Administration
Step VI: Edit web.config files of Different web applications
Step VII: Alternate Access Mapping [AAM] Configuration
Step VIII: Configure Web Policy
Step IX: Configure Anonymous Access
Step I: Create a database in SQL for FBA users
For creating database for FBA users .NET framework provides an inbuilt utility ‘aspnet_regsql’. You need to configure database through utility wizard. Rest of things it will automatically create in database. You have to follow below given steps to create ne database for FBA Users.
Path: C:\WINDOWS\Microsoft.NET\Framework\v2.0.50727
Utility: aspnet_regsql.exe
Run aspnet_regsql.exe. A wizard will display on your screen.Click Next.. Select ‘Configure SQL Server for application services’ for creating new database and click Next..
Server Name will automatically selected so need to change this.Provide SQL server authentication and select or create new database and click Next...
Now database has been created or modified. Click Finish.

Now Step I has been completed and SQL Database for FBA users has been ready to use.
Step II: Add FBA User in SQL Database
To add user in SQL database, you need to create a small web site through visual studio.
For this, Go to File -> New -> Web Site
After providing appropriate web site name you will get a web site structure. If web.config is not present in structure than right click on project -> add new item and select ‘Web Configuration File’. Now we need to follow below two steps,
I) web.config Modification
II) Configure ASP.NET
I) web.config Modification: Double click on web.config file and add below sections in existing web.config file.Ø Add Connection String:
[connectionstrings]
[add name="FBA_ConnStr" connectionstring="server=SERVER_NAME;database=DATABASE_NAME; Integrated Security=SSPI;Trusted_Connection=True"]
[/connectionstrings]
Note : Add above in section [configuration][/configuration]but remember it must not be first child in this tag.
Ø Add Membership Provider:
[membership defaultprovider="AcAspNetSqlMembershipProvider"]
[providers]
[add connectionStringName="FBA_ConnStr" enablePasswordRetrieval="false"
enablePasswordReset="true"
requiresQuestionAndAnswer="true"
applicationName="/"
requiresUniqueEmail="false"
passwordFormat="Hashed"
maxInvalidPasswordAttempts="5"
minRequiredPasswordLength="1"
minRequiredNonalphanumericCharacters="0"
passwordAttemptWindow="10"
passwordStrengthRegularExpression=""
name="AcAspNetSqlMembershipProvider"
type="System.Web.Security.SqlMembershipProvider, System.Web,
Version=2.0.0.0, Culture=neutral,PublicKeyToken=b03f5f7f11d50a3a" /]
[/providers]
[/membership]
Note: above in section [system.web]
Ø Add Role Manager Provider:
[rolemanager enabled="true" defaultprovider="AcAspNetSqlRoleProvider"]
[providers]
[add connectionStringName="FBA_ConnStr"
applicationName="/"
name="AcAspNetSqlRoleProvider"
type="System.Web.Security.SqlRoleProvider, System.Web, Version=2.0.0.0, Culture=neutral, PublicKeyToken=b03f5f7f11d50a3a" /]
[/providers]
[/rolemanager]
Note: above in section [system.web]
Ø Change Authentication Type: [authentication mode="Forms"]
II) Configure ASP.NET:
To ASP.NET Configuration, Go to Website -> Click ASP.NET Configuration ->Select tab ‘Provider’ -> Click ‘Select a different provider for each feature (advanced)’
- Select your membership provider
- Select your role provider
And test successfully. After that go to tab ‘Security’
- In section Roles click link ‘Create or Manage roles’ and create roles for e.g. admin, reader etc.
- In section Users Click link ‘Create user’ and fill specific information related to FBA users.
Now FBA Users have been created and ready to use for your site and Step II has been completed.
Step III: Create a Web Application [Default Zone]
To create new web application go to Central Administration -> Click ‘Application Management’.And click ‘Create or extended Web application’
Click on ‘Create a new Web application’ Now select ‘Create a new IIS web site’ and provide the specific port for this web application. Fill all relative fields and click ‘Ok’.
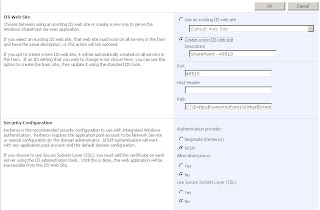

 After creating new web application successfully, create a default web site for this web applicaion.
Step IV: Extend Web Application [Internet Zone]
Now to use above web application for internet or interanet, we need to extend above newly creted web application on different port. For this go to go to Central Administration -> Click ‘Application Management’ And click ‘Create or extended Web application’.
After that click on ‘Extend an existing web application’.
 Select your web application which you have created above ans provide different port for this web application. Also select ‘Create a new IIS web site’. And at last in section ‘Load Balanced URL’, select your different zone like internet in my case.

 Step V: Configure Authentication in Central Administration
To Configure Authentication you need to Go to Central Administration -> Application Management -> Authentication ProvidersSelect your web application. You will see different zones (Default and internet in my case) with membership provider name. By default this is ‘Windows’ authentication.
 No need to change any setting for default zone site. We need to configure internet or interanet zones. For this, click internet/Interanet zone and configure it for form based authentication. Below screen shows changes which need to configure FBA. You need to change
Authentication type – Select ‘Forms’
Annonymous Access – Enabled
Membership Provider Name –Write Provider Name (in my case: AcAspNetSqlMembershipProvider)
Role Manager Name –Write Role Manager Name (in my case: AcAspNetSqlRoleProvider)
Client Integration – Not Recommended for internet site (If need to enable Microsoft office interaction at client end like multiple file upload, create new item in document library etc.)After these changes click save button.
 Now you will see provides like below screen.
 Step VI: Edit web.config files of Different web applications
Please do this thing very carefully. It is highly recommended to take backup of these files before doing any change. Now we need to add some sections in web.config file of
- Default Web Application [Default Zone]
- Extended Web Application [Internet Zone]
- Central Administration web Application.
for getting relative web.config file click start -> run -> inetmgr -> select your server -> web sites -> right click on your web site -> click open and open web.config file of that perticular web application. Open this web.config in any editor and add below section carefully.
For Default Web Application [Default Zone]: Open web.config file of that web application which is running on default zone. And add below section carefully.
Ø Add Connection String
[connectionStrings]
[add name="FBA_ConnStr" connectionstring="server=SERVER_NAME;database=DATABASE_NAME; ;Integrated Security=SSPI;Trusted_Connection=true" providerName="System.Data.SqlClient"/]
[/connectionStrings]
Note : Add above in section [configuration][/configuration] but remember it must not be first child in this tag.
Ø Add Membership Provider
[membership defaultProvider="AcAspNetSqlMembershipProvider"]
[providers]
[add connectionStringName="FBA_ConnStr" applicationName="/" name="AcAspNetSqlMembershipProvider" type="System.Web.Security.SqlMembershipProvider, System.Web, Version=2.0.3600.0, Culture=neutral, PublicKeyToken=b03f5f7f11d50a3a" /]
[/providers]
[/membership]
Note : Add above in section [system.web][/system.web].
Ø Add Role Manager
[roleManager enabled="true" defaultProvider="AspNetWindowsTokenRoleProvider"]
[providers]
[add connectionStringName="FBA_ConnStr" applicationName="/" name="AcAspNetSqlRoleProvider" type="System.Web.Security.SqlRoleProvider, System.Web, Version=2.0.3600.0, Culture=neutral, PublicKeyToken=b03f5f7f11d50a3a" /]
[/providers]
[/roleManager]
Note : Add above in section [system.web][/system.web].
Ø Add PeoplePickerWildcards
[add key="AcAspNetSqlMembershipProvider" value="%" /]
Note : Add above in section [ PeoplePickerWildcards][/ PeoplePickerWildcards].
Extended Web Application [Internet/Interanet Zone]:Open web.config file of that web application which is running on internet/interanet zone. And add below section carefully.
Ø Add Connection String:
[connectionStrings]
[add name="FBA_ConnStr" connectionstring="server=SERVER_NAME;database=DATABASE_NAME; ;Integrated Security=SSPI;Trusted_Connection=true" providerName="System.Data.SqlClient"/]
[/connectionStrings]
Note : Add above in section [configuration][/configuration] but remember it must not be first child in this tag.
Ø Add Membership Provider:
[membership defaultProvider="AcAspNetSqlMembershipProvider"]
[providers]
[add connectionStringName="FBA_ConnStr" applicationName="/" name="AcAspNetSqlMembershipProvider" type="System.Web.Security.SqlMembershipProvider, System.Web,Version=2.0.3600.0, Culture=neutral, PublicKeyToken=b03f5f7f11d50a3a" /]
[/providers]
[/membership]
Note : Add above in section [system.web][/system.web].
Ø Add Role Manager:
[roleManager enabled="true" defaultProvider="AcAspNetSqlRoleProvider"]
[providers]
[add connectionStringName="FBA_ConnStr" applicationName="/" name="AcAspNetSqlRoleProvider" type="System.Web.Security.SqlRoleProvider, System.Web,Version=2.0.3600.0, Culture=neutral, PublicKeyToken=b03f5f7f11d50a3a" /]
[/providers]
[/roleManager]
Note : Add above in section [system.web][/system.web].
Ø Add PeoplePickerWildcards:
[add key="AcAspNetSqlMembershipProvider" value="%" /]
Note : Add above in section [ PeoplePickerWildcards][/ PeoplePickerWildcards].
Ø Edit tag compilation (For Error- 401 UnAuthorize):
If you get error 401 UNAUTHORIZE at the time of sign in with FBA than please try this
[compilation batch="true" debug="true"]
like below
[compilation batch="false" debug="false"]
And also when you visit the URL could you please check which Zone does the site belongs to in the IE status bar? I suppose the URL belongs to the Intranet Zone or Trusted Sites which automatically log on with your current windows credential. If your windows credential does not have the permission to access the site, you would get 401 unauthorized error. If so, please remove the sites from the Intranet Zone or Trusted Sites and try again.
Central Administration web Application:Open web.config file of that web application which is running on internet/interanet zone. And add below section carefully. It is highly recommend to take back up before doing any thing in this file.
Ø Add Connection String:
[connectionStrings]
[add name="FBA_ConnStr" connectionstring="server=SERVER_NAME;database=DATABASE_NAME; ;Integrated Security=SSPI;Trusted_Connection=true" providerName="System.Data.SqlClient"/]
[/connectionStrings]
Note : Add above in section [configuration][/configuration] but remember it must not be first child in this tag.
Ø Add Membership Provider:
[membership defaultProvider="AcAspNetSqlMembershipProvider"]
[providers]
[add connectionStringName="FBA_ConnStr" applicationName="/" name="AcAspNetSqlMembershipProvider" type="System.Web.Security.SqlMembershipProvider, System.Web,Version=2.0.3600.0, Culture=neutral, PublicKeyToken=b03f5f7f11d50a3a" /]
[/providers]
[/membership]
Note : Add above in section [system.web][/system.web].
Ø Add Role Manager:
[roleManager enabled="true" defaultProvider="AspNetWindowsTokenRoleProvider"]
[providers]
[add connectionStringName="FBA_ConnStr" applicationName="/" name="AcAspNetSqlRoleProvider" type="System.Web.Security.SqlRoleProvider, System.Web,Version=2.0.3600.0, Culture=neutral, PublicKeyToken=b03f5f7f11d50a3a" /]
[/providers]
[/roleManager]
Note : Add above in section [system.web][/system.web].
Ø Add PeoplePickerWildcards:
[add key="AcAspNetSqlMembershipProvider" value="%" /]
Note : Add above in section [ PeoplePickerWildcards][/ PeoplePickerWildcards].
Step VII: Alternate Access Mapping [AAM] Configuration
Alternate Access Mapping enables you to access your Sharepoint site via a typical url like http://mytesting.com/ instead of hitting the server name at http://my/testingsite . In combination with DNS A host entries you can also define urls like http://%20mytesting.sharepoint.com/ even though your My Site web application is hosted on a different port. It is very necessary if you are using ISA server or reverse proxy server. To configure AAM,
Go to Central Administration -> Operations Tab -> Click on Alternate Access Mappings in section Global Configuration
 Now you can see a list of your web applications, switch over to the one you want to map to the new URL by selecting it from the drop down on the right side.Click on Edit Public URLs and change the desired zone URL type to your new domain name. You can also change your internal URLs also by clicking Add Internal URLs. See below screen.
Step VIII: Configure Web Policy Some times FBA user is not resolved by any people picker in whole site. For this it is necessary to configure web application policies in central administration. To configure this
Go to Central Administration -> Application Management -> Click Policy for Web application in section Application Security.
 Select your web application. And click link ‘Add Users’.
 Select Zone (Internet in my case) and click next..
 Write User name in people picker and resolve this. When you will get this user give permission for that user and click ‘Finish’.
 Now user will be available in list with selected zone. I am not sure but it is only one time process for any user after that it is not necessary to add any other user in this section. Only this process can resolve all FBA users in any people picker. See below screen.
 Step IX: Configure Anonymous Access
Now it is needed to set anonymous access for internet site other wise it creates some access problems.
To set anonymous access, first you need to add FBA user in sharepoint owners group from default zone web application. After that need to access internet site with FBA login
Go to section ‘Site Settings’ -> Click ‘Advance Permissions’ in section ‘Users and Permission’.
 Select Setting -> Anonymous Access
 And change it for Entire Web Site
 Now you have done all steps to configure form based authentication in MOSS.
Cheers !! :-)
Step I: Create a database in SQL for FBA Users
Step II: Add FBA User in SQL Database
Step III: Create a Web Application [Default Zone]
Step IV: Extend Web Application [Internet Zone]
Step V: Configure Authentication in Central Administration
Step VI: Edit web.config files of Different web applications
Step VII: Alternate Access Mapping [AAM] Configuration
Step VIII: Configure Web Policy
Step IX: Configure Anonymous Access
Step I: Create a database in SQL for FBA users
For creating database for FBA users .NET framework provides an inbuilt utility ‘aspnet_regsql’. You need to configure database through utility wizard. Rest of things it will automatically create in database. You have to follow below given steps to create ne database for FBA Users.
Path: C:\WINDOWS\Microsoft.NET\Framework\v2.0.50727
Utility: aspnet_regsql.exe
Run aspnet_regsql.exe. A wizard will display on your screen.Click Next..
 Select ‘Configure SQL Server for application services’ for creating new database and click Next..
Server Name will automatically selected so need to change this.Provide SQL server authentication and select or create new database and click Next...

Now database has been created or modified. Click Finish.

Now Step I has been completed and SQL Database for FBA users has been ready to use.
Step II: Add FBA User in SQL Database
To add user in SQL database, you need to create a small web site through visual studio.
For this, Go to File -> New -> Web Site
After providing appropriate web site name you will get a web site structure. If web.config is not present in structure than right click on project -> add new item and select ‘Web Configuration File’. Now we need to follow below two steps,
I) web.config Modification
II) Configure ASP.NET
I) web.config Modification: Double click on web.config file and add below sections in existing web.config file.Ø Add Connection String:
[connectionstrings]
[add name="FBA_ConnStr" connectionstring="server=SERVER_NAME;database=DATABASE_NAME; Integrated Security=SSPI;Trusted_Connection=True"]
[/connectionstrings]
Note : Add above in section [configuration][/configuration]but remember it must not be first child in this tag.
Ø Add Membership Provider:
[membership defaultprovider="AcAspNetSqlMembershipProvider"]
[providers]
[add connectionStringName="FBA_ConnStr" enablePasswordRetrieval="false"
enablePasswordReset="true"
requiresQuestionAndAnswer="true"
applicationName="/"
requiresUniqueEmail="false"
passwordFormat="Hashed"
maxInvalidPasswordAttempts="5"
minRequiredPasswordLength="1"
minRequiredNonalphanumericCharacters="0"
passwordAttemptWindow="10"
passwordStrengthRegularExpression=""
name="AcAspNetSqlMembershipProvider"
type="System.Web.Security.SqlMembershipProvider, System.Web,
Version=2.0.0.0, Culture=neutral,PublicKeyToken=b03f5f7f11d50a3a" /]
[/providers]
[/membership]
Note: above in section [system.web]
Ø Add Role Manager Provider:
[rolemanager enabled="true" defaultprovider="AcAspNetSqlRoleProvider"]
[providers]
[add connectionStringName="FBA_ConnStr"
applicationName="/"
name="AcAspNetSqlRoleProvider"
type="System.Web.Security.SqlRoleProvider, System.Web, Version=2.0.0.0, Culture=neutral, PublicKeyToken=b03f5f7f11d50a3a" /]
[/providers]
[/rolemanager]
Note: above in section [system.web]
Ø Change Authentication Type: [authentication mode="Forms"]
II) Configure ASP.NET:
To ASP.NET Configuration, Go to Website -> Click ASP.NET Configuration ->Select tab ‘Provider’ -> Click ‘Select a different provider for each feature (advanced)’
- Select your membership provider
- Select your role provider
And test successfully. After that go to tab ‘Security’
- In section Roles click link ‘Create or Manage roles’ and create roles for e.g. admin, reader etc.
- In section Users Click link ‘Create user’ and fill specific information related to FBA users.
Now FBA Users have been created and ready to use for your site and Step II has been completed.
Step III: Create a Web Application [Default Zone]
To create new web application go to Central Administration -> Click ‘Application Management’.And click ‘Create or extended Web application’

Click on ‘Create a new Web application’
 Now select ‘Create a new IIS web site’ and provide the specific port for this web application. Fill all relative fields and click ‘Ok’.

 After creating new web application successfully, create a default web site for this web applicaion.
Step IV: Extend Web Application [Internet Zone]
Now to use above web application for internet or interanet, we need to extend above newly creted web application on different port. For this go to go to Central Administration -> Click ‘Application Management’ And click ‘Create or extended Web application’.
After that click on ‘Extend an existing web application’.
 Select your web application which you have created above ans provide different port for this web application. Also select ‘Create a new IIS web site’. And at last in section ‘Load Balanced URL’, select your different zone like internet in my case.
 Step V: Configure Authentication in Central Administration
To Configure Authentication you need to Go to Central Administration -> Application Management -> Authentication ProvidersSelect your web application. You will see different zones (Default and internet in my case) with membership provider name. By default this is ‘Windows’ authentication.
 No need to change any setting for default zone site. We need to configure internet or interanet zones. For this, click internet/Interanet zone and configure it for form based authentication. Below screen shows changes which need to configure FBA. You need to change
Authentication type – Select ‘Forms’
Annonymous Access – Enabled
Membership Provider Name –Write Provider Name (in my case: AcAspNetSqlMembershipProvider)
Role Manager Name –Write Role Manager Name (in my case: AcAspNetSqlRoleProvider)
Client Integration – Not Recommended for internet site (If need to enable Microsoft office interaction at client end like multiple file upload, create new item in document library etc.)After these changes click save button.

 Now you will see provides like below screen.
 Step VI: Edit web.config files of Different web applications
Please do this thing very carefully. It is highly recommended to take backup of these files before doing any change. Now we need to add some sections in web.config file of
- Default Web Application [Default Zone]
- Extended Web Application [Internet Zone]
- Central Administration web Application.
for getting relative web.config file click start -> run -> inetmgr -> select your server -> web sites -> right click on your web site -> click open and open web.config file of that perticular web application. Open this web.config in any editor and add below section carefully.
For Default Web Application [Default Zone]: Open web.config file of that web application which is running on default zone. And add below section carefully.
Ø Add Connection String
[connectionStrings]
[add name="FBA_ConnStr" connectionstring="server=SERVER_NAME;database=DATABASE_NAME; ;Integrated Security=SSPI;Trusted_Connection=true" providerName="System.Data.SqlClient"/]
[/connectionStrings]
Note : Add above in section [configuration][/configuration] but remember it must not be first child in this tag.
Ø Add Membership Provider
[membership defaultProvider="AcAspNetSqlMembershipProvider"]
[providers]
[add connectionStringName="FBA_ConnStr" applicationName="/" name="AcAspNetSqlMembershipProvider" type="System.Web.Security.SqlMembershipProvider, System.Web, Version=2.0.3600.0, Culture=neutral, PublicKeyToken=b03f5f7f11d50a3a" /]
[/providers]
[/membership]
Note : Add above in section [system.web][/system.web].
Ø Add Role Manager
[roleManager enabled="true" defaultProvider="AspNetWindowsTokenRoleProvider"]
[providers]
[add connectionStringName="FBA_ConnStr" applicationName="/" name="AcAspNetSqlRoleProvider" type="System.Web.Security.SqlRoleProvider, System.Web, Version=2.0.3600.0, Culture=neutral, PublicKeyToken=b03f5f7f11d50a3a" /]
[/providers]
[/roleManager]
Note : Add above in section [system.web][/system.web].
Ø Add PeoplePickerWildcards
[add key="AcAspNetSqlMembershipProvider" value="%" /]
Note : Add above in section [ PeoplePickerWildcards][/ PeoplePickerWildcards].
Extended Web Application [Internet/Interanet Zone]:Open web.config file of that web application which is running on internet/interanet zone. And add below section carefully.
Ø Add Connection String:
[connectionStrings]
[add name="FBA_ConnStr" connectionstring="server=SERVER_NAME;database=DATABASE_NAME; ;Integrated Security=SSPI;Trusted_Connection=true" providerName="System.Data.SqlClient"/]
[/connectionStrings]
Note : Add above in section [configuration][/configuration] but remember it must not be first child in this tag.
Ø Add Membership Provider:
[membership defaultProvider="AcAspNetSqlMembershipProvider"]
[providers]
[add connectionStringName="FBA_ConnStr" applicationName="/" name="AcAspNetSqlMembershipProvider" type="System.Web.Security.SqlMembershipProvider, System.Web,Version=2.0.3600.0, Culture=neutral, PublicKeyToken=b03f5f7f11d50a3a" /]
[/providers]
[/membership]
Note : Add above in section [system.web][/system.web].
Ø Add Role Manager:
[roleManager enabled="true" defaultProvider="AcAspNetSqlRoleProvider"]
[providers]
[add connectionStringName="FBA_ConnStr" applicationName="/" name="AcAspNetSqlRoleProvider" type="System.Web.Security.SqlRoleProvider, System.Web,Version=2.0.3600.0, Culture=neutral, PublicKeyToken=b03f5f7f11d50a3a" /]
[/providers]
[/roleManager]
Note : Add above in section [system.web][/system.web].
Ø Add PeoplePickerWildcards:
[add key="AcAspNetSqlMembershipProvider" value="%" /]
Note : Add above in section [ PeoplePickerWildcards][/ PeoplePickerWildcards].
Ø Edit tag compilation (For Error- 401 UnAuthorize):
If you get error 401 UNAUTHORIZE at the time of sign in with FBA than please try this
[compilation batch="true" debug="true"]
like below
[compilation batch="false" debug="false"]
And also when you visit the URL could you please check which Zone does the site belongs to in the IE status bar? I suppose the URL belongs to the Intranet Zone or Trusted Sites which automatically log on with your current windows credential. If your windows credential does not have the permission to access the site, you would get 401 unauthorized error. If so, please remove the sites from the Intranet Zone or Trusted Sites and try again.
Central Administration web Application:Open web.config file of that web application which is running on internet/interanet zone. And add below section carefully. It is highly recommend to take back up before doing any thing in this file.
Ø Add Connection String:
[connectionStrings]
[add name="FBA_ConnStr" connectionstring="server=SERVER_NAME;database=DATABASE_NAME; ;Integrated Security=SSPI;Trusted_Connection=true" providerName="System.Data.SqlClient"/]
[/connectionStrings]
Note : Add above in section [configuration][/configuration] but remember it must not be first child in this tag.
Ø Add Membership Provider:
[membership defaultProvider="AcAspNetSqlMembershipProvider"]
[providers]
[add connectionStringName="FBA_ConnStr" applicationName="/" name="AcAspNetSqlMembershipProvider" type="System.Web.Security.SqlMembershipProvider, System.Web,Version=2.0.3600.0, Culture=neutral, PublicKeyToken=b03f5f7f11d50a3a" /]
[/providers]
[/membership]
Note : Add above in section [system.web][/system.web].
Ø Add Role Manager:
[roleManager enabled="true" defaultProvider="AspNetWindowsTokenRoleProvider"]
[providers]
[add connectionStringName="FBA_ConnStr" applicationName="/" name="AcAspNetSqlRoleProvider" type="System.Web.Security.SqlRoleProvider, System.Web,Version=2.0.3600.0, Culture=neutral, PublicKeyToken=b03f5f7f11d50a3a" /]
[/providers]
[/roleManager]
Note : Add above in section [system.web][/system.web].
Ø Add PeoplePickerWildcards:
[add key="AcAspNetSqlMembershipProvider" value="%" /]
Note : Add above in section [ PeoplePickerWildcards][/ PeoplePickerWildcards].
Step VII: Alternate Access Mapping [AAM] Configuration
Alternate Access Mapping enables you to access your Sharepoint site via a typical url like http://mytesting.com/ instead of hitting the server name at http://my/testingsite . In combination with DNS A host entries you can also define urls like http://%20mytesting.sharepoint.com/ even though your My Site web application is hosted on a different port. It is very necessary if you are using ISA server or reverse proxy server. To configure AAM,
Go to Central Administration -> Operations Tab -> Click on Alternate Access Mappings in section Global Configuration
 Now you can see a list of your web applications, switch over to the one you want to map to the new URL by selecting it from the drop down on the right side.Click on Edit Public URLs and change the desired zone URL type to your new domain name. You can also change your internal URLs also by clicking Add Internal URLs. See below screen.
Step VIII: Configure Web Policy Some times FBA user is not resolved by any people picker in whole site. For this it is necessary to configure web application policies in central administration. To configure this
Go to Central Administration -> Application Management -> Click Policy for Web application in section Application Security.
 Select your web application. And click link ‘Add Users’.
 Select Zone (Internet in my case) and click next..
 Write User name in people picker and resolve this. When you will get this user give permission for that user and click ‘Finish’.
 Now user will be available in list with selected zone. I am not sure but it is only one time process for any user after that it is not necessary to add any other user in this section. Only this process can resolve all FBA users in any people picker. See below screen.
 Step IX: Configure Anonymous Access
 Now it is needed to set anonymous access for internet site other wise it creates some access problems.
To set anonymous access, first you need to add FBA user in sharepoint owners group from default zone web application. After that need to access internet site with FBA login
Go to section ‘Site Settings’ -> Click ‘Advance Permissions’ in section ‘Users and Permission’.
 Select Setting -> Anonymous Access
 And change it for Entire Web Site
 Now you have done all steps to configure form based authentication in MOSS.
Cheers !! :-)